If you have ever followed a guide on how to start programming, most likely you have encounter reflections about the importance of adding comments to your code. Comments allow you to understand what the developer was thinking when programming, maybe left some traces of what could be improved. If you are developing software in places where people change often, it is crucial to leave extra information behind, to speed up the catching up of the new developers.
Python has a very robust system for documenting functions, classes and variables. It is so robust that allows you to check for help in the interactive console, it can be used for testing your code and can be converted into beautifully formatted HTML or PDF documentation. In this tutorial, you will see how to write documentation for your projects and how to host it for free on Read The Docs.
Building a Simple Module
To start with this tutorial, we will need to build a simple module, with some classes and functions. My recommendation is to work inside a Virtual Environment. Start by creating a folder to hold your project. Inside create a new folder called my_module and add an empty __init__.py file. Create a file called factorial.py and add the following code:
import math

def factorial(n):
    if not n >= 0:
        raise ValueError("n must be >= 0")
    if math.floor(n) != n:
        raise ValueError("n must be exact integer")
    if n + 1 == n:  # catch a value like 1e300
        raise OverflowError("n too large")
    result = 1
    factor = 2
    while factor <= n:
        result *= factor
        factor += 1
    return result
You can find the files in tag 0.1 on GitHub. If you would like to use the code, you can do the following:
>>> from my_module.factorial import factorial
>>> factorial(5)
120
And you can also use the help, like this:
>>> help(factorial)
Help on function factorial in module my_module.factorial:

factorial(n)
Which is not very descriptive, but we will get to it.
Adding Docstrings
When you use the command help, Python will look for a string right
after the definition of the function. In the case of factorial there
we no string, so let's add one and see how it works. I will remove the
extra code for brevity and will replace it by [...].
def factorial(n):
    'Function to calculate the factorial'
[...]
Remember that if you make changes to a module in Python, you have to quit and import it again. If you just reimport a module, you won't see the latest changes. And now you will see the following:
>>> help(factorial)
factorial(n)
    Function to calculate the factorial
The string that is being printed is the same that you wrote right after
the definition of your function. Traditionally in Python, docstrings are
defined using three '', which will allow you to span the documentation
into several lines as well. For example:
def factorial(n):
    """Function to calculate the factorial.
    For example:

    >>> factorial(5)
    120
    """
    [...]
The example above is showing you that you can extend the documentation
of a function also with examples. Next time you use help, you will see
a more complete explanation of what the function does and how to use it.
If you are familiar with numpy, for example, you should try to run help
on any of its modules. You will notice the level of detail that they
accomplish in their documentation.
Of course, you are not limited to documenting functions. You can document the entire module by adding a string right at the top of the file.
"""
Module factorial
================
This module supplies one function, factorial() to calculate the factorial of an integer.
"""
import math
[...]
If instead of importing the function, you import the module, you can see:
>>> from my_module import factorial
>>> help(factorial)
Help on module factorial:

NAME
    factorial

DESCRIPTION
    Module factorial
    ================
    This module supplies one function, factorial() to calculate the factorial of an integer.

FUNCTIONS
    factorial(n)
        Function to calculate the factorial of a number.
        For example:

        >>> factorial(5)
        120
As you can see, docstrings are very useful when you are trying to navigate a package full of modules. You can quickly understand if the module factorial is what you are looking for or not. It doesn't matter if you are reading the code itself or if you are working from the command line, the docstrings are a great way of communicating with other developers (and even with your future self).
The code up to here can be found in Tag 0.3.
From docstrings to doctest
A very useful approach when developing code is to test it. Especially if you are going to collaborate with others. Testing means to run the code with inputs to which you know the expected outcome. If the output is correct, the test passes, if the output is not correct, the test fails. This is a very systematic way to be sure that modifications to existing code are not going to ruin code downstream, for example.
Building tests is no simple task because you have to be sure of what you want to test. Docstrings allow you an easy path to testing through the examples that you provide. If you pay attention to the code above, you can see that we have already provided an example of how to use the code and the expected output. You can instruct Python to look for these examples and check if the output matches.
python -m doctest -v factorial.py
And you will see that the output actually says that it is trying to
execute factorial(5) and that it is expecting the output to be 120.
This is great because if you are trying to improve the code, you have to
be sure that at least when you use the number 5 it works correctly.
Another possible behavior is to check that if you are outside of the
limits, and an error is raised. You don't want to calculate the
factorial of -1, for instance. We can add a new example to the
docstring:
def factorial(n):
    """ [...]
    >>> factorial(-1)
    Traceback (most recent call last):
    ...
    ValueError: n must be >= 0
    """
If you test your code again, you will see that this time there are two tests that pass. This article is not really on testing, but it was important to point out that docstrings are a very easy way to testing, at least the basic functionality of your packages. You can also add examples at a module level, not only at a function level.
Documenting classes and methods
When you work with classes and methods, the docstrings work in exactly the same way. Let's create a new file called people.py with two classes and some methods:
class Person:
    def __init__(self, name):
        self.name = name

class Teacher(Person):
    def __init__(self, name, course):
        super().__init__(name)
        self.course = course

    def get_course(self):
        return self.course

    def set_course(self, new_course):
        self.course = new_course
As an exercise, you can write the docstrings for each class and method,
or you can go directly to Tag
0.5
and grab the example from there. There is something very important to
note and is that classes should document all the methods, also the
__init__ and the class itself. If you use the help command, you will
see the following:
>>> from people import Person
>>> help(Person)
class Person(builtins.object)
 |  Class to store a general person information. For example the name.
 |
 |  Methods defined here:
 |
 |  __init__(self, name)
 |      Create a person object by providing a name
It is important to note that you can get the help not only of the class but also of an instance of that class. For example, you can generate the same output if you do:
>>> me = Person('My Self')
>>> help(me)
Moreover, you can access the docstring directly, as an attribute of the class, and you can modify it:
>>> Person.__doc__
'Class to store a general person information. For example the name.'
Building Documentation with Sphinx
Now you have developed a package with several modules, each with its own docstring. However, this can be even better. You can compile all the docstrings of your modules into a single place, a website or a pdf, that will make it very easy to share the information, look for help and provide examples that extend what is appropriate for a docstring. To achieve all this, you need to install a package called Sphinx:
pip install sphinx
Sphinx can convert a special format of files, called RestructuredText
into other handy formats, such as html, pdf, etc. After you have
installed sphinx, the quickest is to run sphinx-quickstart which will
guide you through some questions in order to create the needed folders,
the base config.py file and a starting point. You are free to try it
out. I am going to take the slightly longer path, covering the details
of what you should do.
First, create a folder called docs, next to the folder my_module. This will allow you to separate the development of code from the development of the code itself. If you are using version control, this can make your life much easier. Inside the docs, create a folder source and place a file called config.py, with the following:
project = 'My Module'
copyright = '2018, Aquiles Carattino'
author = 'Aquiles Carattino'
version = ''
release = '0.1'
templates_path = ['_templates']
source_suffix = '.rst'
master_doc = 'index'
pygments_style = 'sphinx'
html_theme = 'alabaster'
html_static_path = ['_static']
This file specifies some general properties of the project, such as the version, the release, the author, etc. And some options that are important for building the documentation, such as the default source suffix, i.e. which files are going to be parsed. The configuration help has all the information that you need to customize the build. Create a new file, called index.rst and add the following:
Welcome to My Module's documentation!
=====================================
This is going to become the future documentation of My Project

.. toctree::
     :maxdepth: 2
     :caption: Contents:
Next, just run the following command from the docs folder:
sphinx-build -b html source/ build/
If you check now the build folder, you will see that several files were generated. Open index.html and you will find a page that looks like the following:

Adding the documentation of your modules
One of the advantages of Sphinx is that it can automatically build the documentation for your modules. Let's see how to do it. Next to the file index.rst create a new file called people.rst and add the following:
.. automodule:: my_module.people
    :members:
You will need to update the file config.py in order to instruct sphinx to build the documentation for your modules. Add the following:
import os
import sys

sys.path.insert(0, os.path.abspath('../..'))
extensions = [
'sphinx.ext.autodoc',]
The first few lines are needed in order to tell Sphinx where your package is. In this case, since you start in the source folder, it is two levels up. Then, you need to add an extension, that will allow you to build the documentation for modules. Run again the command:
sphinx-build -b html source/ build/
You should see a warning message stating:
[...] people.rst: WARNING: document isn't included in any toctree
Don't worry about it now. It is just telling you that there are no links to the file, and therefore someone who is browsing through your documents will not be able to reach that file. If you look again at the folder build you will see a new file called people.html. Open it, and you should see the following:
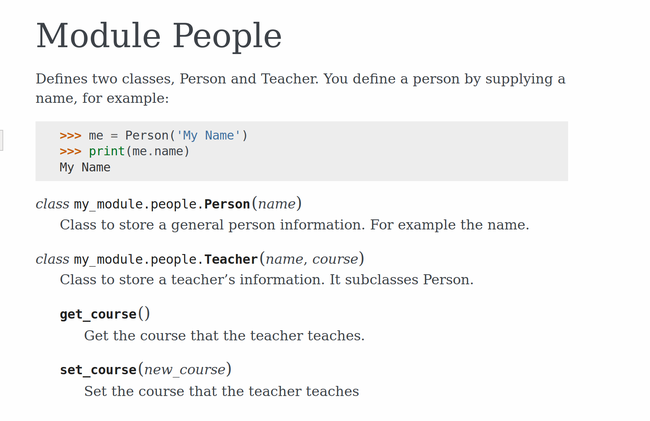
Which is a great starting point for the documentation of your project! You see the code nice highlighted. You should see that the first part of the page corresponds to the docstring of the module, this is the first string that you defined at the beginning of the file. The rest is grabbing each of the classes that you have defined within that module.
Now we can add the documentation for factorial, creating a new file called factorial.rst next to index.rst and people.rst. Add the following content:
.. automodule:: my_module.factorial
    :members:
And now it is time to link to these files from index.rst in order to be able to navigate through the documentation. Add the following:
.. toctree::
    :maxdepth: 2
    :caption: Contents:

    factorial
    people
Build again the documentation and now you should see that there are no more warnings. Moreover, if you open index.html you will see the links to the two pages. You can find all the code at Tag 0.6 on Github.
Customizing the pages
So far you have used the automodule command, together with the option
:members:, but you are not obliged to do that. You can build the
documentation for specific elements, and you can add more information
than the provided in the docstrings. Let's update the factorial.rst
file. Add the following:
How to calculate the factorial
==============================
The factorial is a mathematical operation that calculates the product of all the numbers up to the specified integer.

For example, the factorial of 5 would be 1*2*3*4*5 = 120. With our code we can do the following::

    >>> factorial(5)
    120

.. automodule:: my_module.factorial

The function Factorial
======================
The function factorial is also well documented.

.. autofunction:: my_module.factorial.factorial
If you build again the documentation, you will see that the output has
changed a lot. First, the title of the page is How to calculate the
factorial and now you have some structure in the Table Of Contents.
You will see these changes also if you check the index.html file.
Restructured text is very complex, and it is not our scope to cover it
all. What you should know, at least, is that to make titles you have to
underline them with =. Subtitles, i.e. second order titles, are
underlined with - and so forth. You can check the Quick Reference to
Restructured
Text if
you want to learn more.
If you want to include code, you have two options.
This is an example::

    >>> factorial(5)
    120

But this also works:

.. code-block:: pycon

    >>> factorial(5)
    120

The indenting is important to establish beginning and ending of blocks.
Now you see that the complexity of the documentation is growing. You can add examples, extra information, math formulas. You are actually building a complete website, just that a part of it is automatically created from code. If you are curious, this website is built using a similar approach, you can check the code of the articles in the website repository.
Styling the Docstrings
So far we have added some simple information in the docstrings, but this is not all that you can do. For example, the factorial function takes as arguments integers and returns integers. This can also be specified in the docstring, making it very easy to track possible errors. When you want to go to this extent of detail, you will see that different packages use different styles, i.e., you specify inputs and outputs in different ways. We are going to follow the reST style, which is automatically supported by Sphinx and editors such as Pycharm.
Edit factorial.py with the following:
def factorial(n):
    """
    [...]
    :param n: Number to calculate the factorial
    :type n: int
    :return: The calculated factorial
    :rtype: int
     """
First, you explain what the parameter is, in this case, the input n. You can also explicitly tell the type of the input. If the function returns something, you can explain what it returns and the type of the return. In this case, it is again an integer. If you build the documentation again, you will see that this information is automatically added to the page factorial.html.
Some other possible styles are Epydoc, which relies on its own generator, instead of Sphinx, reST, which we used above, Google has its own style, and finally, you can also use the Numpy Style. You have to find the one you feel more comfortable with. In the end, they all provide the same functionality.
Linking to other modules
When you are documenting your programs, you will notice that you will
need to refer to some other pieces of code that you have written. In our
example, Teacher subclasses Person, and therefore it can be handy to
add a link to it in the docstring. You can edit people.py with the
following:
class Teacher(Person):
    """Class to store a teacher's information. It subclasses :class:`Person`."""
    [...]
Note the addition of
:class:`Person. If you build the documentation again, you will see that that code turns into a link the appropriate file. If you check Tag
0.7
<https://github.com/PFTL/website/tree/0.7/example_code/11_documenting/docs/source>_ you will see that it works even if you split the documentation into different files. For example, we have created a new page for the teacher documentation, but the link still points to where the class Person`
is defined.
Running tests with Sphinx
We have seen before that you can use the docstrings to run tests in your
code. You can think about them as testing your code or testing whether
your documentation is up to date. In any case, it would be very handy if
sphinx could run the doctest while building the documentation. In this
way, you can check all your files, instead of testing one by one.
The first step is to update your conf.py file by adding the doctest extension:
extensions = [
    'sphinx.ext.autodoc',
    'sphinx.ext.doctest',]
And now you can trigger sphinx with another parameter:
sphinx-build -b doctest source/ output/
This will generate a new file called output.txt with the same
information that was printed to screen. Most likely you will see that
some fails appear, and if you look closely you will see that the problem
is that, for example, NameError: name 'factorial' is not defined. This
happens because doctest is trying to run the example code without
importing the appropriate modules. The easiest solution is to explicitly
import the function you need. For example, factorial will look like
this:
def factorial(n):
    """Function to calculate the factorial of a number.
    First import, and then use, for example:

    >>> from my_module.factorial import factorial
    >>> factorial(5)
    120
    >>> factorial(-1)
    Traceback (most recent call last):
        ...
    ValueError: n must be >= 0

    :param n: Number to calculate the factorial
    :type n: int
    :return: The calculated factorial
    :rtype: int
    """
You can also add the import statement to the docstring of the module, and with this, you know that you will have it available in the rest of the code. You can see, for example, the code at Tag 0.8. Running doctests is a great way of improving the quality of your documentation and of your code without too much effort. Moreover, you also give people the possibility to check that everything is behaving correctly before sending your suggestions for code changes (pull requests on Github).
Read The Docs
Now you have learned how to build the documentation on your local machine. Anybody with your code and Sphinx installed can run the same commands and build the HTML files. However, being able to host them somewhere will make it very handy for people who would like to see and learn from your code. It will also be indexed by search engines, effectively increasing your online visibility. If you look around, all big projects have their documentation hosted online.
If you want to host the documentation on your own web server, you can do it easily. However, this adds not only money for the web server, but also effort, since you need to maintain the pages updated every time there is a change to the documentation. This is when Read The Docs comes into play. It is a service that automatically builds the documentation of your projects and hosts it open to the public.
The only requirement for Read the Docs to work is that you have your code in a repository such as Github, GitLab or Bitbucket. I won't cover the details of those repositories here, I will assume you know how to work with them.
Go to Read The Docs (RTL) and create an account. Follow the steps and activate your e-mail. Once you have logged in, go to your settings:
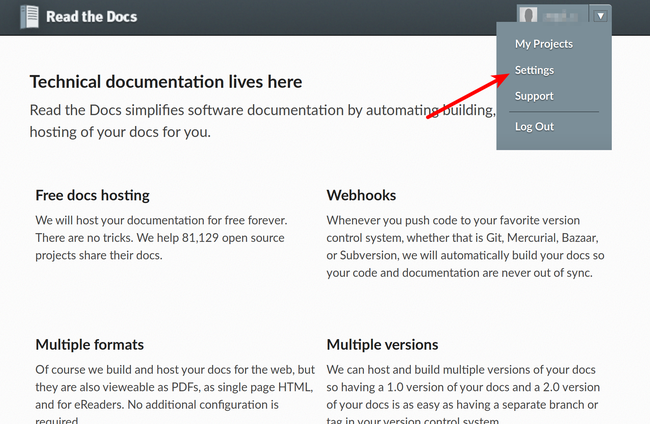
And then you have to select the services you want to connect to your account:

If for some reason you cannot connect the service that you want, you can manually import the repository. Just go to My Projects and select the option that says Import Manually. Once you have imported your project, you have to configure how do you want your documentation to be built. You have to open the project and go the*Admin* panel. Select Advanced Settings.
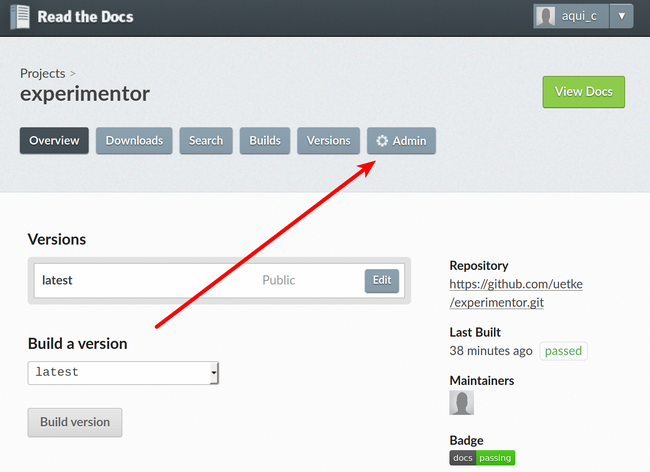
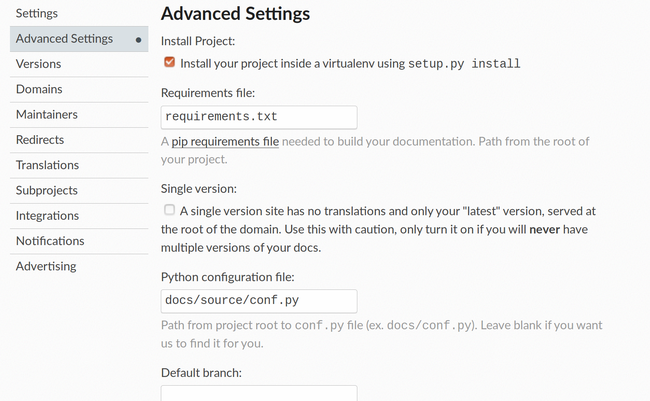
You will see that the platform allows you to install the package inside a Virtual Environment. This is very important and is something we haven't discussed yet. When you build the documentation with Sphinx, what is actually happening is that the program imports all the modules and checks for the docstrings. For this to work, Sphinx needs to be able to import the module. Let's say that you use numpy, which is not installed by default with Python. If you import a module that depends on numpy but it is not installed, the import process will fail.
If you have a file that lists all the packages that have to be installed for your program to work, Read The Docs can automatically install them in a virtual environment and then build the documentation. That is what the requirements.txt file is for. You can see how to generate one by reading our article on the Virtual Environment. The other important parameter is the location of the conf.py file. Normally you would place it in docs/source/conf.py, but that can change from project to project. You can go through the rest of the options. Remember to set the proper Python version that you need for your program to run.
If you go to the Versions option, you will be able to select for which version to build the documentation. For example, you can build documentation only for a specific branch, or for a specific version. In this way you won't risk users reading documentation is not supposed to be online yet but that is work in progress. Remember that if there is a mismatch between the documentation and the code, a lot of questions are going to arise.
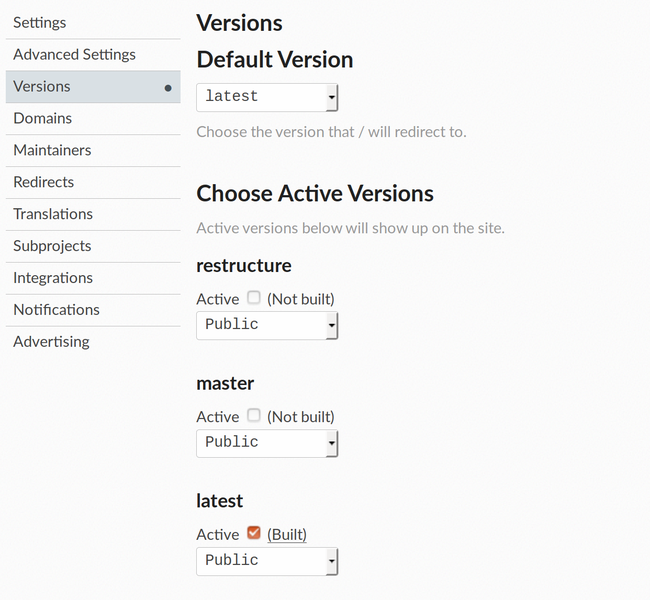
That is basically it. You can trigger a build of your documentation and see what happens. You can see the history of builds and their results. If you click on any of them, you will see all the commands that were executed and their outcome, if any. Including any errors. If the build passes, you can click the green button that says View Docs. Now you have a beautiful, online version of the documentation of your program.
Read the Docs even allows you to add the code of Google analytics to
track how many visitors your project has. However, when you start
building up in complexity, it is also harder for Read the Docs to work
out of the box. Special packages, which cannot be installed with pip
need special handling, which we may cover in a future article.
If you want the documentation to automatically build when there is an update in the repository, you need to add a webhook. Head over to the Admin of your project and select Integrations which will allow you to set up a webhook. If you have any doubt, webhooks are very well documented in Read The Docs. The core idea is that any time there is a change in a repository, it will use the webhook to let different services know about the update, and that will trigger, for example, a new built of the documentation.
Conclusions
Documenting your code is fundamental if you want your programs to be sustainable over time. Adding comments where appropriate is the first step any good programmer should take. Adding docstrings to modules, functions, and classes is the first step. If you add Sphinx to the mix, you can start building beautiful documentation in the form of websites, for example. Moreover, you can host the website with Read The Docs, which will automatically build the documentation for you.
Having the documentation as a website is a great way of attracting attention. It will be indexed by search engines, making it more discoverable. You can also supply examples, images, whatever you think that can be useful. I really appreciate when the documentation guides you quickly through the installation process and some examples. Just for you to get started.
Heder photo by chuttersnap on Unsplash
